Quantcast
Channel: Core77
Viewing all 19132 articles
Browse latest View live

Design Job: Load 'er Up! Mack Trucks is Seeking a Product Design Director in Greensboro, NC

$
0
0

In an environment of change, with exiting new technologies and rapidly changing customer requirements, Product Design is looking for a dynamic and insightful Design Director Mack Trucks. The Design Director is a key role for our capability to innovate and prioritize design solutions for future products and services, to continue to build the legacy of the legendary Mack Truck.

View the full design job here

Tools & Craft #81: On Apprenticeships

$
0
0

Craft apprenticeships never took hold in the United States in the way that they did in Europe.

Why are they wearing these silly hats? I explained it here.

Apprenticeships existed here but even in colonial times, an ever-expanding country and a constant demand for talent meant that anyone with a modicum of skills could get a job--even if they weren't fully trained. There was little incentive for a skilled apprentice to complete their indenture, little enforcement, and a steady stream of immigrants to fill the need for trained craftsman.

In the United States today some forward looking companies have apprenticeship programs of one sort or another, but in general a person gets out of school with a BA or something like that and tries to get work in a good shop. Of course the shop needs them to produce, so while ideally there might be some training, most of the time is just learning production.

In Europe, via a combination of industry support, strict rules on hiring and firing, and government aid, apprenticeship systems exist for recent school graduates. You can actually go to University to study to become a joiner and in the process of your schooling work as an apprentice in cabinetmaking shops. Unlike the old days when one would start at age fourteen, the apprenticeships are more like what in England they called "improvers". People who knew the basics and were now traveling to new shops to round out their experience and broaden their horizons.

In Germany today there is even a group of journeyman who are following the strict medieval rules of journeymen and are walking from town to town, working in shops along the way.

In other news: The Joiner and Cabinetmaker, is back in print. The only contemporary narrative training course from the pre-machine tool age this book, originally published in 1839, tells the story of how Thomas was trained as a joiner. Complete with projects, instructions, and a villain. Originally published 1n 1839, with historical commentary by me. All three projects in the book were build by Chris Schwarz. If you don't already have a copy, you can get one here!

Steven M. Johnson's Bizarre Invention #345: How to Exercise While Commuting

Reader Submitted: Take Note: WEMO is a Wearable Memo Band for Front Line Workers and Medical Use

Designing for Wood Movement, Part 2: The Right Way to Attach a Tabletop

$
0
0

In the last entry we saw a builder create a tabletop the wrong way. By not obeying the rules of wood movement, the builder has doomed the tabletop to failure.

The rule that the builder ought have followed is a simple one: Design for boards to expand and contract along their width. A competent designer/builder never traps a piece of wood within a four-sided frame.

For centuries, builders have known how to attach tabletops in such a way that they will not lift up off of the base, yet can still expand and contract freely. Their trick is simple, which is to use slots and cleats (also called buttons). This system not only allows the tabletop to move around, but also keeps it flat.

Image via Blake

The cleats/buttons are simple and can be made from cut-offs. Take care to ensure the grain is aligned properly.

Ganging up production. (Image via Popular Woodworking)

The tabletop is screwed directly to the apron at only two points, both along the centerline of the tabletop's width. With this being the only fixed point, when the tabletop expands or contracts, the overhangs will still be even on both sides.

The cleats are each screwed directly into the tabletop with a single screw. Pay attention when making the cleat to ensure the grain is running in the correct direction, so that you don't have to worry about the cleat expanding too.

The tongue of the cleat fits into slots or a continuous groove cut into the inside of the apron.

Image via Blake

The cleats that are placed at the short ends of the table can slide freely from side-to-side in the groove, or a slot that has been cut wider than the tongue to leave room for this.

The cleats placed along the long edges of the table should have their tongues sized so that there is room for them to travel deeper into the groove when the tabletop expands, and can withdraw, without popping out, when the tabletop shrinks.

Image via Woodcraft
Image via Woodcraft

These days there is also a variety of metal hardware you can buy that will perform the same trick as a cleat. Search the web and you'll find plenty. Here are a couple of examples:

Rockler Table Top Fasteners.

If you don't want to cut grooves or slots and prefer to use a drill press and a Forstner bit, an alternative is Rockler's Figure 8 Desktop Fasteners.

Here's a video on how to install them:

Cutting the Grooves or Slots

Whether you cut a continuous groove or a slot depends on which tool you have or prefer to use: Circular saw, table saw, router, Festool Domino, a drill press and a lot of patience, or a chisel. Cutting these slots or grooves prior to assembly is obviously the most efficient, and if something goes awry during assembly--let's say you have to correct for a mis-cut joint and now have to plane the tops of some of the aprons a bit to get them all level, which then means your slots are closer to the tabletop on those modified aprons--it's then easy enough to simply re-cut a wooden cleat to the correct height.

However, this gentleman below takes a different approach, and cuts the slots after assembly using a router and a rabbeting bit:

So that's just a reminder that you don't have to be locked into a single way of doing this. You can decide what works best for you, your process, your design, and the tools you own.

Pro Tip

Slightly off-topic but relevant: If you're building a table for a client and delivering it yourself, you may be transporting it with the tabletop and base unattached, as it's easier to get through doorways and such. Here's a pro tip from designer/builder Peter Dettorre on figuring out the alignment beforehand in your shop, so you're not futzing around too much on-site:

Next we'll look at the technique a competent builder would use to avoid the horrific wood movement issues seen here.

Design Job: Make Everyday Living Easier as an OXO Graphic Designer at Helen of Troy 

$
0
0

If you have ever thought, "There has got to be a better way to do this!", you belong at OXO. Our mission is to make everyday living easier by identifying those annoyances that we all have and developing products that help make short work of life's daily tasks.

View the full design job here

How to Make an Inexpensive DIY Sandblaster

$
0
0

Watching rust get blasted off of metal is always satisfying. It must be even more satisfying to do it, particularly when you're using a self-made sandblaster. DIY'er Adam Fleisch figured out how to make one for under six bucks, using an airgun and a soda bottle, and the darn thing actually works:


Demonstrating a 3D-Printed Remote Controlled Snowblower

$
0
0

Growing up in the wintry American northeast, the joy of no-school Snow Days was offset by the arduous task of shoveling under adult directive. But now parents can rob their children of this character-building exercise by introducing a remote-controlled, 3D-printed miniature snowblower into the household, allowing their kids to stay inside and spend more time cyberbullying their classmates.

Designed by Ryan Spyker, this Spyker KAT is small but pretty damn impressive. Here a guy is putting it through its paces in four inches of snow, and -18 Celsius (about 0 Fahrenheit) temperatures:


How to Select the Right 3D Printing Process

$
0
0

Introduction

One of the most challenging tasks facing designers and engineers new to 3D printing is having to navigate through the vast number of 3D printing processes and materials to find the solution that is best for their application.

In this article, we present several easy-to-use tools to help you select the right 3D printing process for your application.

Overview of the 3D Printing processes
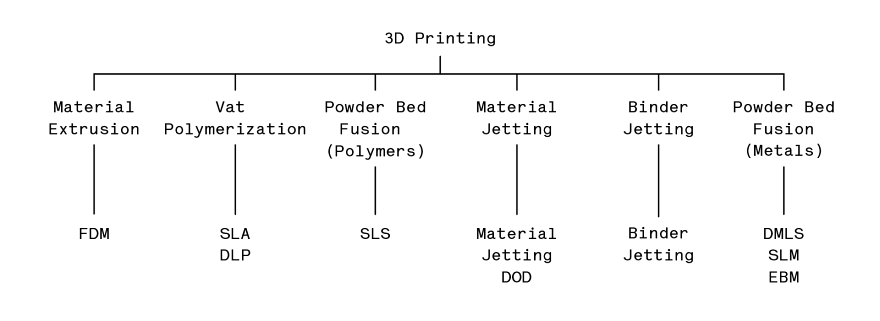
3D printing (or Additive Manufacturing) is an umbrella term that encompasses multiple processes

The ISO/ASTM 52900 Standard was created in 2015 to standardize all terminology and classify each of the different methods of 3D printing. A total of seven process categories were established.

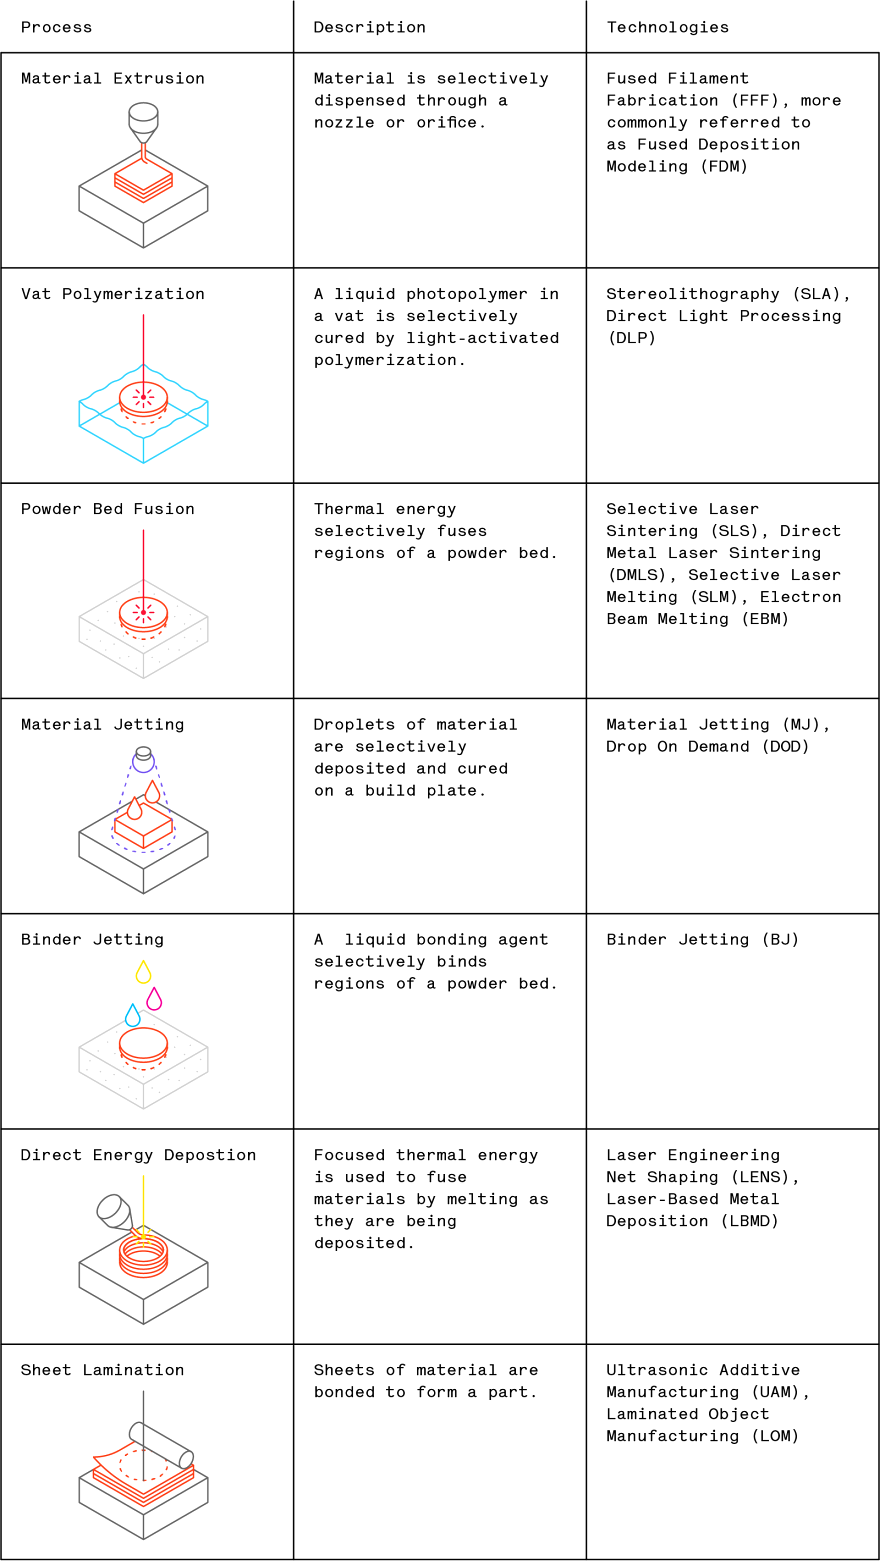
Each of these and the associated process description are presented in the following table:

Classification of the 3D printing technologies. A high-res poster with all 3D printing process is available here for free download.

Of these technologies, Fused Deposition Modeling (FDM) and Stereolithography (SLA) are the most easily accessible and cost-competitive options, as both industrial and desktop systems are widely available.

For high-end polymer applications, Selective Laser Sintering (SLS) and Material Jetting (MJ) are popular options, while SLM and DMLS or Binder Jetting can produce 3D printed metal parts.

With all these options, how can a designer decide which process is best for an application?

Decision making tools

Let's jump right in...

"With 3D printing, it is particularly important to determine early in the selection process whether the main design criteria are based on functional requirements or visual appearance. This greatly simplifies the selection process."

To further simplify things and make the information in this article actionable, some high-level generalizations are introduced as useful starting points for the decision making process:

— Functional polymer parts: compare FDM vs. SLS (thermoplastics). SLS parts have superior physical properties, but FDM is more cost-effective. For parts with highly complex geometry, SLS is generally the only option.

— Visual polymer parts: For parts where aesthetics are important, we suggest to compare SLA vs. Material Jetting (thermoset). They both can produce parts with injection-mold like appearance, but Material Jetting has the upper hand in terms of surface finish and dimensional accuracy, but at a significantly higher price point. 

—Metal parts: compare Binder Jetting vs. DMLS/SLM (metal powders). DMLS/SLM parts have excellent mechanical properties and dimensional accuracy, while Binder Jetting can be up to 10x cheaper and is usually the only option for producing large metal parts.

Note: Use the above guidelines as a starting point, there are many situations in which these generalized rules do not apply. For example, SLA or Material Jetting can produce functional parts from speciality materials (such as low-run injection molds and hearing aids). Also, low-cost visual prototyping can be often be done using FDM, for example.

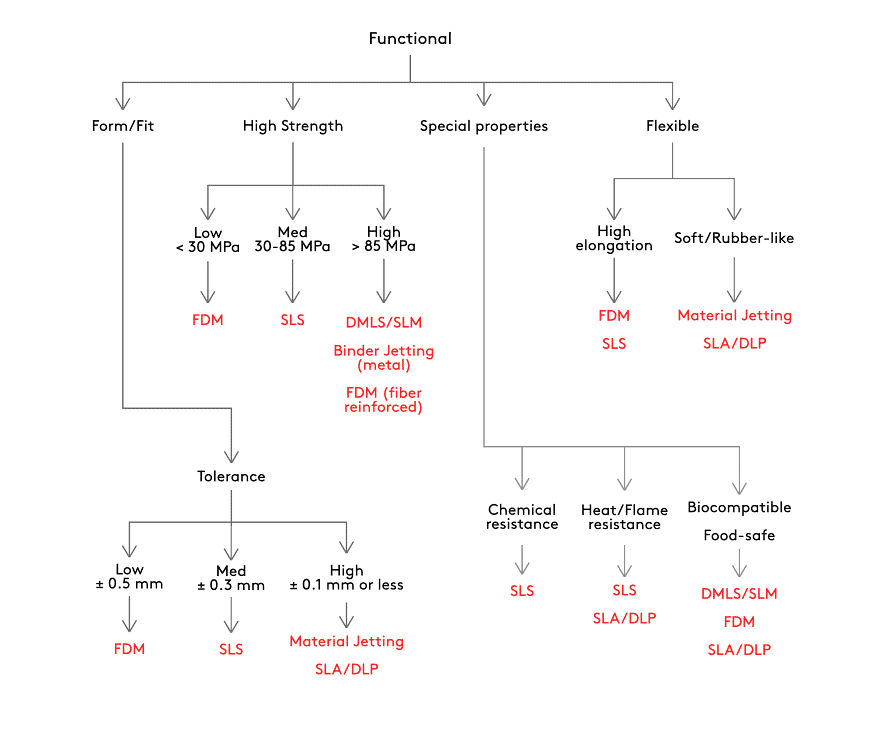
Functional applications 

If functionality is the main goal, the flowchart below can help you identify the most suitable 3D printing process based on your main requirement:

Form & Fit:

When designing a part or prototype that will fit with other components, such as enclosures, it is important to define the necessary level of tolerance. Generally, selecting a process with higher dimensional accuracy and high detail will increase the cost.

An alternative to selecting a process with higher dimensional accuracy is to finish features with critical dimensions after 3D printing (for example by drilling holes or tapping threads).

High Strength:

Overall part strength depends on different mechanical and physical properties. To simplify the selection, the material Tensile Strength can be used as guidance.

When high strength and stiffness are required, metal 3D printing or FDM printing reinforced with continuous carbon fibers are the best solutions.

Special Properties:

Engineering 3D printing materials, like ULTEM, are available with special properties, such as flame retardant and chemical or heat resistant, as well as biocompatible or food-safe certified materials.

High Flexibility:

Flexibility can be defined as either a high elongation at break (flexibility), where common thermoplastics such as TPU are available in SLS and FDM, or as low hardness, where materials with a rubber-like feel are available for SLA and Material Jetting.
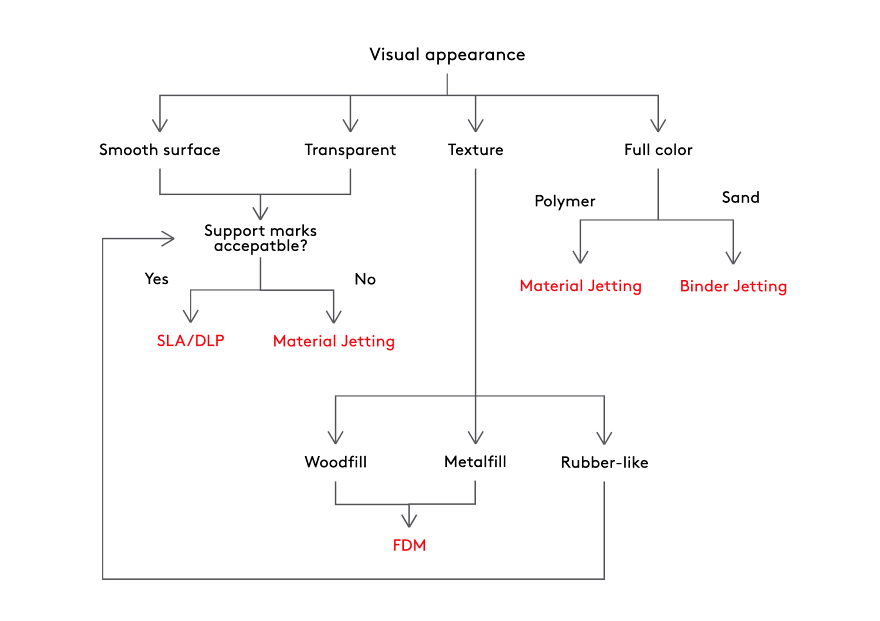
Visual appearance

When visual appearance is the main concern, then the 3D printing process selection can be simplified using the flowchart below:

Smooth Surface:

Both SLA and Material Jetting can produce parts with smooth, injection-mold-like surface finish.

The main difference between the two processes (apart from the cost) is that support in Material Jetting is soluble, while in SLA the support structures to be removed manually after printing, leaving small marks on the surface that need to be post processed (sanded or polished).

Transparency:

Material Jetting can produce fully transparent parts with a glass-like appearance, while SLA parts are printed semi-transparent and can be post processed to be almost 100% optically clear.

Texture:

Parts with special texture, such as a wood-like or metal-like finish, can be printed using woodfill or metalfill FDM filaments.

Rubber-like parts are soft (shore hardness < 70A) and can bend and compress, but lack the performance of true rubber.

Full Color:

Material Jetting and Binder Jetting are the only 3D printing processes that currently offer full-color printing capabilities.

Material Jetting generally is the preferred process, as it offers materials with better physical properties. Multi-color 3D selfies (figurines) are often printed using Binder Jetting, as it is cheaper.
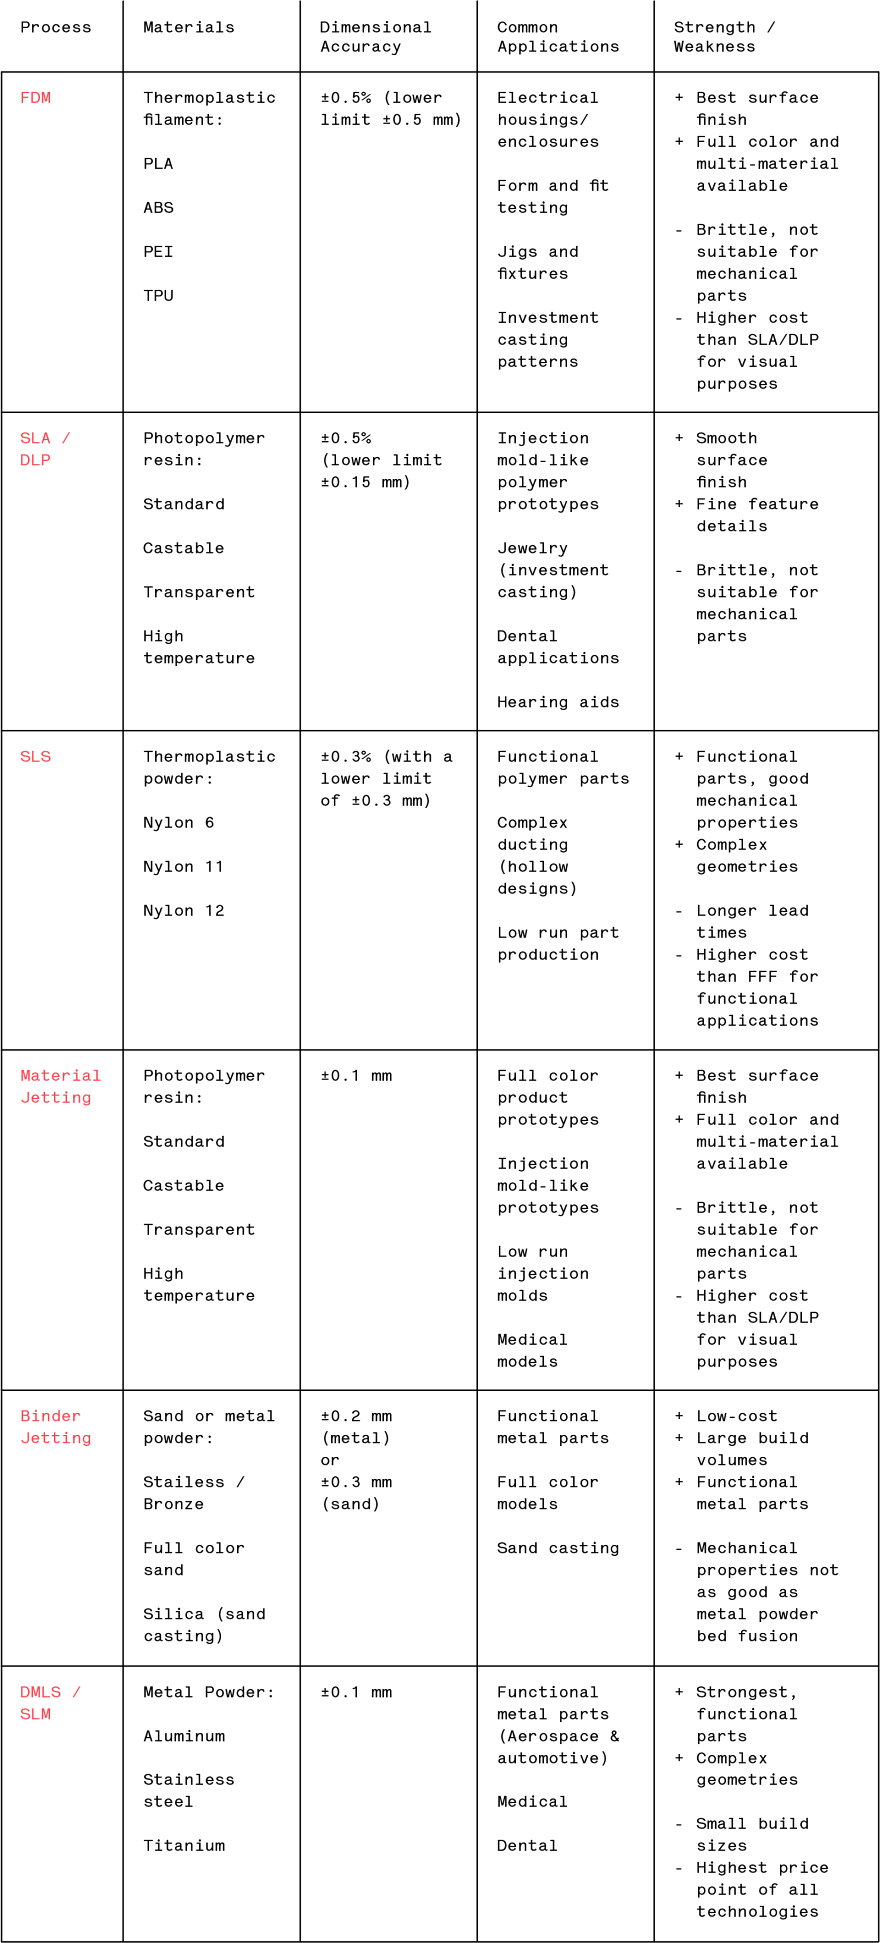
Reference table

The following table can be used for reference to compare between the different 3D printing technologies:

Reference table, summarizing the capabilities and common applications of each 3D printing technology. A high-res infographic with design guidelines for all 3D printing processes is available here for free download.

Conclusions

The guidelines and tables of this article should already give you a basic understanding and reference for choosing between the different 3D printing processes.

For those that want to learn more, The 3D Printing Handbook helps you master all the key aspects of 3D printing. It is designed to read unlike any other engineering book, full of easy-to-understand diagrams and inspiring visuals and will help you find the right 3D printing process for all of your designs.

*****

3D Hubs is the world's largest network of manufacturing services. With production facilities connected in over 140 countries, the 3D Hubs online platform helps you find the fastest and most price competitive manufacturing solution near you. Founded in 2013, the network has since produced more than 1,000,000 parts locally, making it the global leader in distributed manufacturing.

Toy Design Breakthrough: Nintendo's Labo Combines DIY Construction and Physical Activity with Digital Feedback

$
0
0

The knock on kids vis-à-vis electronics these days is that they spend all of their time staring into a glass rectangle. Whether they're playing Candy Crush or Call of Duty, they're not here in the real world and engaged with physical things (XBox controllers don't count).

Nintendo's forthcoming Labo system looks to be a much better prospect. By combining their Switch console with connected cardboard creations that the kids assemble themselves, they've managed to tie the digital to the physical. Which is to say, the user is actually, in the name of play, building and then manipulating a physical object in order to produce a result. That is hopefully the "gateway drug," for lack of a better term, that may lead them into creating objects of their own design.

Have a look at the breadth of the system:

The first kits will be released this April. And for parents who live in San Francisco or New York City, you can sign your kids up for an earlier hands-on event here.

Nike's Research-Driven "1 Reimagined" Collection is Designed by Women, For Women

$
0
0

Nike just announced a 10-pair sneaker collection completely designed by 14 female Nike designers, all working on either Nike's color and materials team or sneaker design team. Drawing inspiration from two of Nike's most iconic sneaker silhouettes—the Air Force 1 and Air Jordan 1—the designers were put to work creating 10 reimagined sneakers, in just a few weeks. They were tasked with the one-liner design brief "Make Cool Shit," and that's exactly what they did.

AJ1 JESTER XX

Research Phase

Hand-picked for the project by Footwear Director Andy Caine, the designers started off at Nike's Blue Ribbon Studio in Portland, spending about a week pinpointing their goals and brainstorming. During their research phase, they focused on "defining the dimensions that make a woman," which was especially important to consider because both the Air Force 1 and Air Jordan 1 were initially designed by men for men.

On that note, Senior Creative Director of Nike Sportswear Georgina James and Material Design Director of Nike Sportswear NikeWomen Marie Crow emphasized the importance of their new design details appearing just feminine enough to appeal to women while still channeling the initial feel of the two footwear icons.

As a result of their research phase, the design collective decided to form five personas to ensure structure and cohesiveness during their upcoming design process—Explorer, Lover, Sage, Rebel and Jester. These five archetypes ended up being a productive structure for the project, as most designers gravitated towards a certain persona more naturally. 

AJ1 REBEL XX
AJ1 SAGE XX
AJ1 EXPLORER XX

Inspiration/Design Trip

To give the designers some breathing room and space to work in a new environment, Nike then sent the 14 designers to their BRS studio in London to finish out the design process. "It was a luxury to work on one project for one week and not think about anything else," James said about the trip.

Proving that designers work well under pressure, the team had to execute the rest of the collection in just four days. During this design sprint, the designers made the key decision to keep the collection monochromatic instead of using multiple colors. "We soon realized that the silhouette had to be the headliner," said Crow. "Color and materials had to be kind of secondary, but still very special. So we looked at different blockings and different details that we could accentuate." 

AJ1 LOVER XX

Result

Not only did the designers create new material combinations for many of the pairs, but they also designed some cool new details to add to Nike's repertoire. Among that list is the bold shape of the AF1 Lover XX, which required a new almond last to realize.

AF1 REBEL XX

Of corse there's talent in creating new designs, but what's equally important is that the designers still managed to show true respect for the Air Force 1 and Air Jordan 1 by knowing exactly which original design details to keep and work around. James noted that, "the biggest challenge actually was trying to get the 10 shoes to have their own personality but still connect." 

The successful connection between the 10 pairs lies within the contrast of familiarity and nostalgia. Dedicated fans can almost immediately identify which models were inspired by the Air Force 1 versus which models were inspired by the Air Jordan 1—mainly because for the most part, they kept the midsole structures and overall shape of the shoes intact with only one or two drastic design changes per shoe. On the flip-side, women fresh into the sneaker scene and original fans alike can both appreciate the new design details the team created.

AF1 JESTER XX
AF1 LOVER XX
AF1 EXPLORER XX

This collection is more extreme and takes design a step further than most Nike collaborations generally go. Besides the undeniable talent these women brought to the table, I'm guessing another main reason for this is the fact that it was an internal collaboration, not an external one. Most of the designers chosen for this project had never worked with each other before, but they all operate under the Nike umbrella. With support from Nike and with deep knowledge of the brand, their varying expertise and design approaches strategically combined in a way that traditional brand x brand collaborations really can't achieve. 

AJ1 SAGE XX

The 1 Reimagined collection is an important step forward for the industry and shows large sneaker companies are starting to embrace the culture and input female sneaker fans and designers can bring to the table. In general, male sneaker designers are most well-known, but hopefully this will bring about a shift in that reality. It's pretty rare that women's sneakers are sought after by men—I think the last two times were these and these—and I can't wait to see the role-reversal happen again.

The 1 Reimagined collection will be available at select retail locations in NYC February 7th, and the collection will then become available on the Nike SNKRS app on February 9th.

*****

The full list of 1 Reimagined designers includes: Georgina James (who lead the group), Magnihild Disngton, Jacqueline Schoeffel, Marie Crow and Chiyo Takashi from color and material, along with footwear designers Louisa Page, Angela Martin, Kara Nykreim, Maire Odinot, Melusine Dieudonne, Jesi Small, Jin Hong, Reba Brammer and Shamees Aden.

It's clear that I'm a fan of this collection, but what are your thoughts on the new designs? Let us know in the comments section below.

China Builds Experimental 33-Story Air Purification Tower That Turns Smog Into Clean Air

$
0
0

To say that the air quality in Chinese cities is bad is an understatement, as you can see below.

Statistics and image via Air Quality Index China

To tackle this, the municipal government of the city of Xian (population 8.7 million), the capital of Shaanxi province, has constructed what is essentially a massive air purifier. Standing some 33 stories (100 meters) tall, the tower is currently being tested by environmental scientists from the Chinese Academy of Sciences. Here's how it works, according to the South China Morning Post:

The system works through greenhouses covering about half the size of a soccer field around the base of the tower. Polluted air is sucked into the glasshouses and heated up by solar energy. The hot air then rises through the tower and passes through multiple layers of cleaning filters.

Scientist Cao Junji, who heads up the research team, told the paper that "improvements in air quality had been observed over an area of 10 square kilometres (3.86 square miles) in the city over the past few months and the tower has managed to produce more than 10 million cubic metres (353 million cubic feet) of clean air a day since its launch."

Cao also claims that the tower "barely requires any" electricity to run during daylight hours. Like you, I'm very curious as to how this all works. With any luck we'll learn more in March, when the research team is expected to release their full report.

Should the findings prove positive, the plan is to start building absolutely gigantic versions of these smog towers. The research team has filed a patent application for a 164-story (500 meter) tower with a greenhouse base that covers nearly 12 square miles (30 square kilometers). A single facility of that size, they reckon, would be able to clean the air for "a small sized city."


How to Build an Illuminated, Ventilated Spray Booth Out of Foamcore

$
0
0

Here industrial designer Eric Strebel shows you how to build your own spray booth out of foamcore. "The unit is very light, that makes it easier to build and potentially move around your shop if you don't have a permanent home for it," Strebel writes. He uses a nifty trick of inducing a slight bend into the material, which provides the strength necessary to support the heavy fan. And though working off of plans from Ventworks, he modifies them with the ergonomic improvement of side- (rather than top-) loading filters. LED strip lights finish it up, ensuring you can see if you're getting even coverage. Take a look:


Design Job: Develop Products with a Purpose as a Graphic Designer at STEL in Santa Barbara, CA

$
0
0

STEL is looking for a Mid-Level Graphic Designer with Outdoor, Sport, and Consumer Electronic industry design experience. Position to be started by end of January, or beginning of February 2018. STEL is a design consultancy located in Santa Barbara, California. Our team consists of a talented group of multidisciplinary creatives combining expertise in design and engineering.

View the full design job here

A Pillow Designed for People Who Wear Glasses

$
0
0

This is one of those products where you're like, "Why did this not exist before?" The Lay See Pillow is designed for the millions of people who wear eyeglasses and like to read in bed while lying on their side:

That cover looks like a bit more of a hassle to remove on laundry day, but it's probably worth the trade-off, judging by the pillow's popularity (it's currently out of stock).

If you're not an eyeglass wearer but your spouse is and uses this pillow: I know that there's got to be a prank application for that channel that runs right under their ear, but I don't know what it is. Yet.


This Italian Machine Cuts Perfectly Spherical Shrubs

$
0
0

Unless you are a landscape architect, you may not realize that clients can order shrubs from nurseries by diameter. Let's say a client orders a dozen 65-centimeter shrubs. Since shrubs tend to grow as they like, with no two alike, it would provide a headache for the nursery to go out and measure what's in the field, or painstakingly trim each one to size.

Hence Italy's Orlandi Group exists. They create specialized machinery that solves problems for nurseries, like this buxus trimming machine being used in Holland:

"[This is] how to have all your plants' diameters uniform and constant over time," the company writes. "So when your customers ask for a buxus that's 40cm in diameter, you're sure you will give them a buxus of 40cm."

Next they plan to adapt the technology for barbershops. (Yes, I'm kidding.)


City of Los Angeles Needs a Graphic Designer, Devises Clever Ad

$
0
0

The City of L.A. needs a graphic designer--or as they put it, a "graphics designer"--to work on signs, posters, pamphlets, et cetera. Perhaps recognizing that municipal graphic design may not appear thrilling, they came up with this ad, which instead appeals to the desire of creatives to fix things:

The strategy has garnered them nearly 30,000 re-Tweets at press time.

Those of you looking for other design work, be sure to check out our job boards, where we promise you won't find any Comic Sans.


Design Job: Gnarly Job Alert! Rome Snowboards is Looking for an Industrial Designer in Waterbury, VT

$
0
0

As part of the Product Design Team, you will be responsible for applying your strong design skills and innovative thinking to create new products for the snowboard Boot, Binding and Softgoods categories. Partnering with each individual category manager, this position will assist in defining aspects of style, fit and function for said categories.

View the full design job here

Wendell Castle, Inimitable Furniture Designer, Builder, Educator and Craftsman, Passes Away

$
0
0

On Saturday Wendell Castle, furniture designer/builder, educator and former instructor at R.I.T.'s School of American Craftsmen, passed away at the age of 85.

Castle was a true pioneer who bridged the gap between furniture design and art. A native of Kansas, Castle attended the University of Kansas and earned a B.F.A. in Industrial Design in 1958 and an M.F.A. in Sculpture in 1961, then began producing fantastical pieces of furniture that refused to hew to any previous movement or style. His radical forms seemed to defy physics, gravity and material properties.

"My furniture goes against the grain of 20th century design," Castle once said. "I have no special interest in form following function. I want to be inventive and playful, to produce furniture to make life an adventure."

Although Castle's designs were the very antithesis of mass production, his industrial design training showed in how he brought these forms into existence. A prolific sketcher, Castle reportedly drew for several hours each day, using overlays to refine his designs and work out impossibly-complex surfaces in an era before CAD. He'd next transition to 3D, producing countless form studies, scale models and maquettes in a process every student of ID would recognize.

When digital technologies became available, Castle embraced them. His studio in Scottsville, New York, outside of Rochester, contained a tool he nicknamed "Mr. Chips:" A six-axis CNC milling robot.

With a body of work like Castle's, it's tough to identify any one defining masterpiece. But his Reaper rocking chair, which Castle designed and built in 2010 when he was in his late '70s, might be it:

The Wright Auction House, which sold the chair for $112,500, describes how his process spanned one of the earliest techniques he'd ever learned all the way up to his usage of Mr. Chips:

Dating back to the 19th century, the technique of stack lamination involves gluing together a number of wood stacks to build up a moulded form and eventually work towards the realisation of an agile, amorphous construction. Castle's initial encounter with this technique was as a teenager, when he apparently came across a magazine article instructing on the use of stack-laminate to create a "decoy duck".
Working in the early stages of his career in alignment with the traditional methods necessitated by stack-lamination, he would project a drawn image of his form onto the wall, before envisaging the necessary differentiations in wood bands and translating them into hand-drawn templates. From these, wood sheets would be cut, glued and stacked together to a form which could be manipulated by hand. This process has now been adapted by Castle to empower the efficiency and accuracy of production through incorporating 3D scanning and modelling.
The technologically-based stack-laminate process comprises the 3D scanning of an original small foam model. From this model, cross-sections are determined and printed out to scale as templates. After being constructed by hand, a milling robot [Mr. Chips] contributes to the final finishing process.

Castle's work is included in the permanent collections of nearly 50 museums around the world (full list here). If you have an opportunity to travel to one of them, I highly recommend it; two-dimensional photography doesn't do justice to his work.

Piamo: An Elegant, Microwaveable Entry in the World of At-Home Espresso

$
0
0

What does an espresso-lover do when the office is too far from the nearest café, the communal kitchen is shared with 600 other employees and there is no coffee machine, just a microwave? Piamo is the first espresso maker worldwide that works in the microwave, combining coffee cup and coffee maker in one unit.

View the full content here
Viewing all 19132 articles
Browse latest View live


Latest Images