Quantcast
Channel: Core77
Viewing all 19155 articles
Browse latest View live

Why Driving Through Six Inches of Water Can Blow Your Engine Up

$
0
0

Parts of Texas are currently experiencing record-breaking levels of flooding brought on by Hurricane Harvey. One of the people who died as a result was reportedly trying to drive her car through a flooded area. The car stalled, the woman became trapped inside as the car filled with water and she subsequently drowned.

It would seem common sense that one oughtn't drive an automobile through a heavily flooded area. But did you know that driving your car through as little as six inches of water can lead to your engine throwing a connecting rod? Here mechanic Scotty Kilmer explains and demonstrates why:


Ingo Maurer's Inflatable LED Lighting Fixtures

$
0
0

This is a brilliant use of materials, and a clear design improvement over its predecessor. Lighting designers Ingo Maurer and Theo Möller have designed the Blow Me Up, an inflatable lighting fixture:

I currently have standard fluorescent lighting fixtures as house lighting in my photography studio, and the Blow Me Up is such a vast improvement over those. Consider that those fluorescent fixtures are metal, making them heavy; for safety’s sake they must be hung with chains connected to eye bolts mounted in the ceiling crossbeams, which limits their placement. On top of that the glass fluorescent bulbs are fragile, and anytime the large lighting boom is used in the studio, great care must be taken so as not to strike the fixture and potentially shatter a bulb.

These inflatable lights could be hung anywhere in the studio using string and screws with anchors. If the boom strikes them, there’s no danger of falling glass shards. And they are of course easier to ship and transport than fluorescent bulbs.

The downside is that the lights are a bit pricey, ringing in at €240 (USD $284) for a single 180cm (about 6’) fixture.

Game of Thrones Recap: "The Dragon and the Wolf"

$
0
0

[Spoilers.]

The episode begins with the Unsullied and Dothraki armies massing outside of King's Landing.

"One thousand fifty-seven, one thousand fifty-eight--stop talking, Bronn! You messed me up and now I have to start all over again."

It's a menacing sight indeed.

"I mean, the moat sounded like a total rip-off when the contractor proposed it, but now I'm kind of kicking myself."

For an army of men who can't feel pain nor attract a mate, their facial armor indicates a preoccupation with protecting their moneymakers.

"Two holes. All they'd have to do is poke two lousy holes in this thing and I could breathe."

Greyworm leads them, taking what meager advantages his position allows.

"I'm taking my helmet off because I don't want to get weird tan lines. I'm supposed to go to a friend's wedding next week."

In this episode we see that Lannister helmets are interesting: They have butterfly-like swing-open eye protection.

"I painted the insides red just to give them a little flair. It works, no?"

Later we see most of the principals sitting down for a summit in the old dragon pits. They're forced to wait for Danaerys.

"I gotta take a leak. The bathroom's down here, yeah?"

The Hound finally runs into his brother, Gregor.

"You can call it whatever you want, Gregor, but I know pinkeye when I see pinkeye."
"But yes, I admit that your nose protector is pretty cool."

Danaerys finally arrives, on dragonback, naturally.

"Let's land on that crumbly, ancient-looking brick wall."
"Hey guys--DRACARYS! Ah, just kidding. You should see your faces!"

The Hound produces the heavy box containing the wight they want to show Cersei.

"I could use some of those JorahStraps."

After the wight is released and they cut it up into pieces, a curious Maester Qyburn picks up its severed hand.

"What the--is it giving me the finger?"

What's weird is that after the proceedings, the mutilated, chained wight corpse is just lying there, and no one does anything with it.

"Whoever looks at it first, has to clean it up."

Over at Winterfell, Sansa presides over a little courtroom drama.

"Why are all of you wearing your helmets indoors?"
"We don't mean to complain, Milady. We're just saying that all of the other armies' helmets have nosepieces, face shields and butterfly eye protectors and they all look wicked cool."

Petyr Baelish is swiftly put to death, and bleeds all over the floor.

"I said, I need a volunteer to clean that up. Ser Ronald--I just saw you looking at it. You know the rules, you clean it up."

Over at Eastwatch, men man the guardposts atop the wall.

There's a communal horn mounted from a chain. When you see trouble, you're meant to blow the horn.

"Gross--someone's frozen saliva is all over this mouthpiece."

Trouble does indeed arrive, in the form of the Night King riding a zombie dragon.

"I added colorant to make the flames blue. Super cool, right?"

Zombie Viserion just starts torching the wall…

…while the army of wights watches jealously.

"Why does HE get to ride it? I bet I could fly it better than he can."

As the wall begins to give way, the men manning it flee for their lives.

"Well maybe I'd move a little faster, Larry, if the steps weren't COMPLETELY COVERED IN ICE. You want me to break my neck?"

Alas, they don't make it, and the wall begins to break.

"Sweet!"

The last thing we see is the Night King flying and leading his army through the breach.

"With all these freaking spikes, this is actually not that comfortable."

See you next season!

Enclosure Design 101

$
0
0

While the power of a hardware product comes from its internal components, a product is typically recognized by its enclosure, the outer shell that encloses electronic products, making them appealing and user-friendly.

In this post I'm going to walk you through the steps for designing a basic enclosure, using the design of a IoT plant monitor product as an example.

The design is based on this awesome project by Ryan Madson—using just a couple of sensors, a WiFi-enabled Photon developer board from Particle, and an online cloud platform called Fathym, he's able to continuously monitor the moisture and temperature of his plant at home.

For the purposes of this example, we're not going to worry about how the enclosure looks, but rather just focus on functionality.

Step 1: Start with the Product Requirements

With any design, I like to begin by thinking about requirements, which can help you keep your development in scope and avoid adding cost and complexity where you don't need it.

At this stage, you should ask yourself, what does my enclosure need to do and what are its most basic functions?

Here are the requirements for our plant monitor enclosure:

1. The enclosure will house a Photon board, a temperature sensor, and a soil moisture sensor.
2. The soil moisture sensor will penetrate at least one inch into the soil.
3. The enclosure will allow for interaction with two buttons on the top of the board.
4. The onboard LED will be visible through the enclosure.

The above features are necessary for a successful design. Notice how the requirements don't go on to include more specific design decisions such as wall thickness dimensions at this point. In the beginning, keep your requirements as streamlined as possible so you can have flexibility in your design later on.

Pro Tip: Enclosing electronics tends to increase the temperature of the system. You may need to add a fan or some sort of heat rejection method if your components are getting too hot.

Step 2: Model the Internal Components

Now on to the enclosure. I generally start a design such as our plant monitor example by thinking about how the innards will be held.

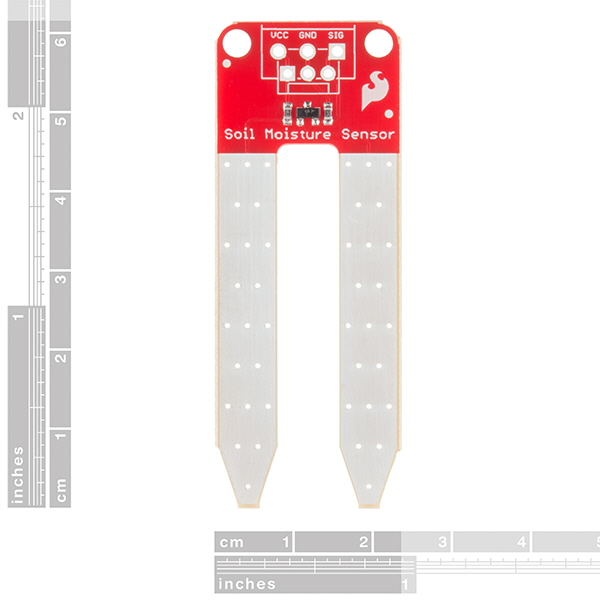
Ideally, you have a good idea of what's going inside the enclosure so you can accurately design around it. In our case, we have a Photon Particle board, a temperature sensor, and a soil moisture sensor.

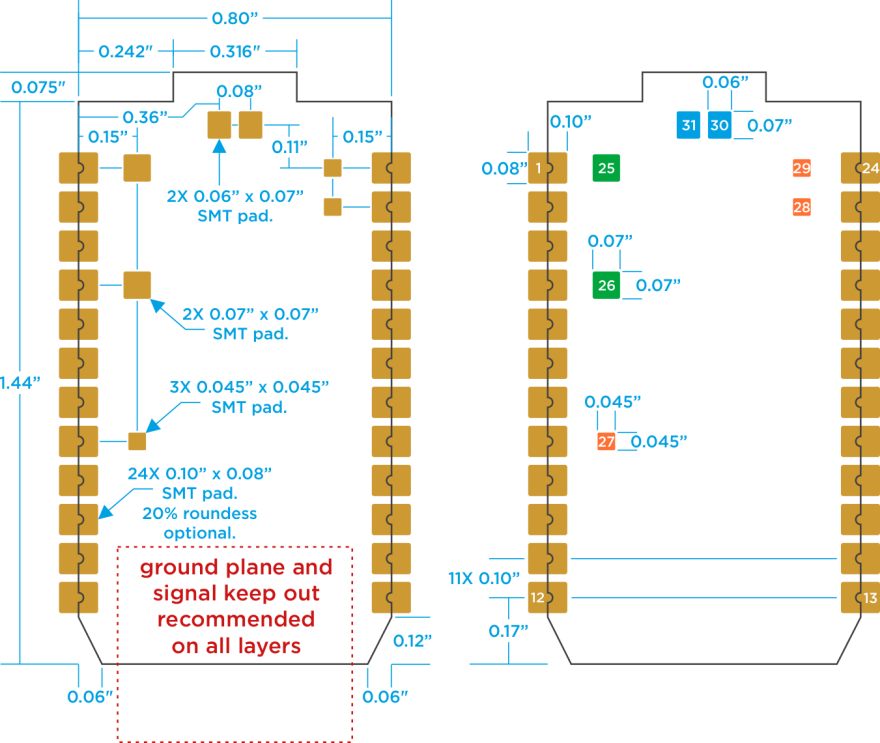
Modeling the larger parts—the Photon board and the soil moisture sensor—will make the 3D design easier and more relevant. You can often find some sort of dimensional drawing from the manufacturer, if not an actual 3D model.

I was able to find dimensions for both the Photon board and the soil moisture sensor, allowing me to create some simple 3D models.

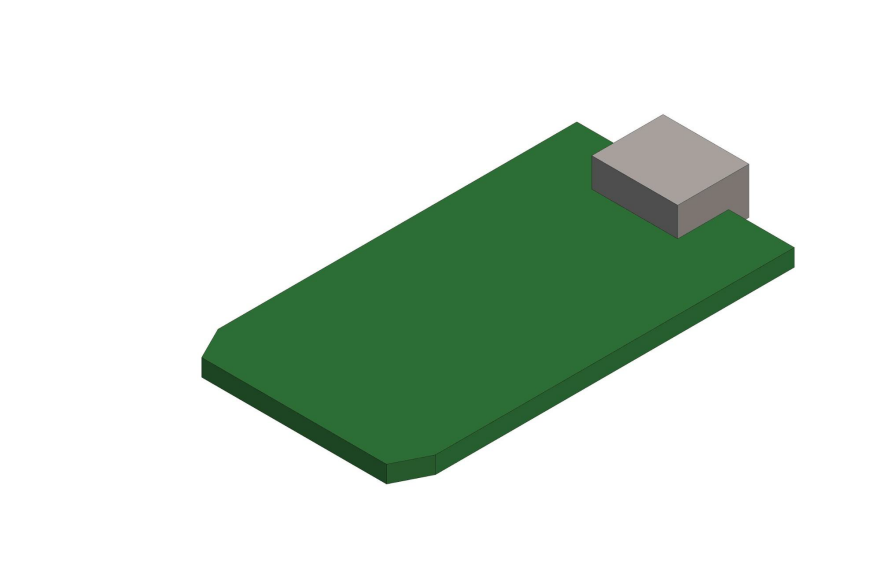
The placeholder models don't need to reflect every feature of the part. The outer dimensions and any mating features are important to model, but everything else can be left out.

For instance, my models of the soil moisture sensor and Photon board are pretty blocky, but the extents of the parts are accurately represented.

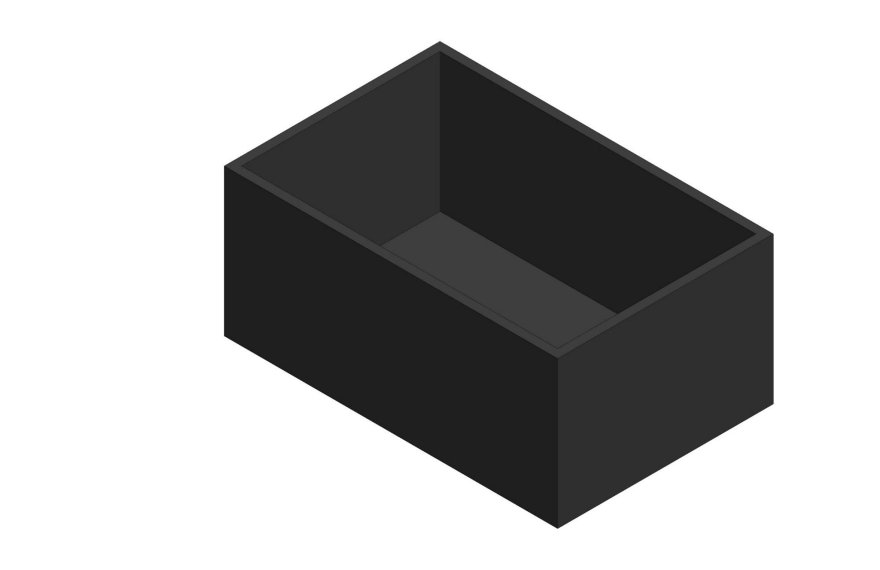
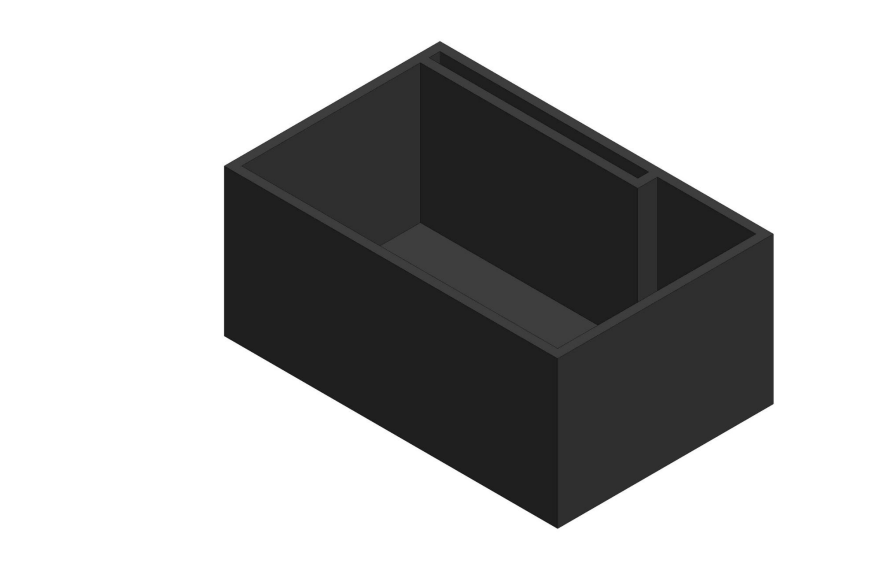
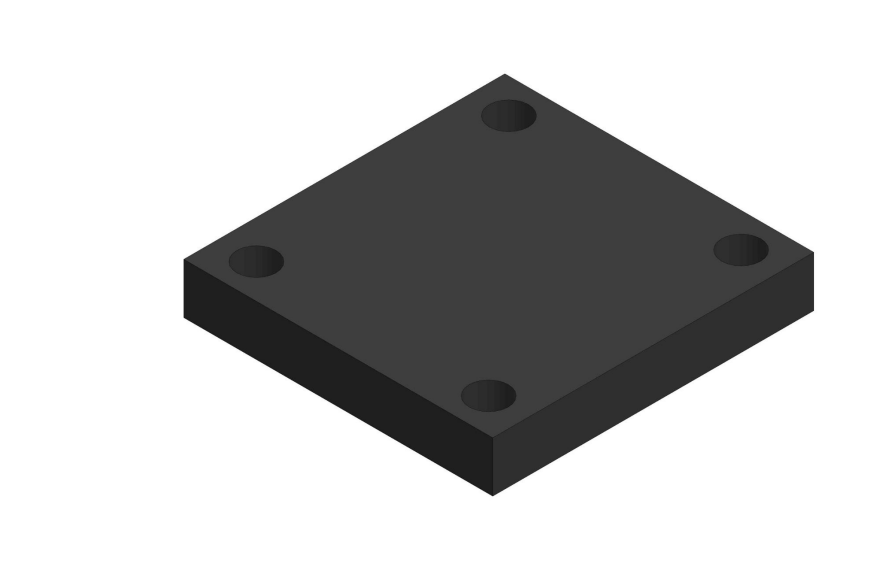
Step 3: Create the Shell

Now that we have models of the electronic parts, we can design our enclosure around them. I start by shelling out a rectangular prism, creating an open box shape.

As we create features, we are striving for uniform wall thicknesses because injection molding, the process we'd use for mass manufacturing, requires it.

I'm going to use .040" wall thicknesses because that will be 3D printable as well as injection moldable.

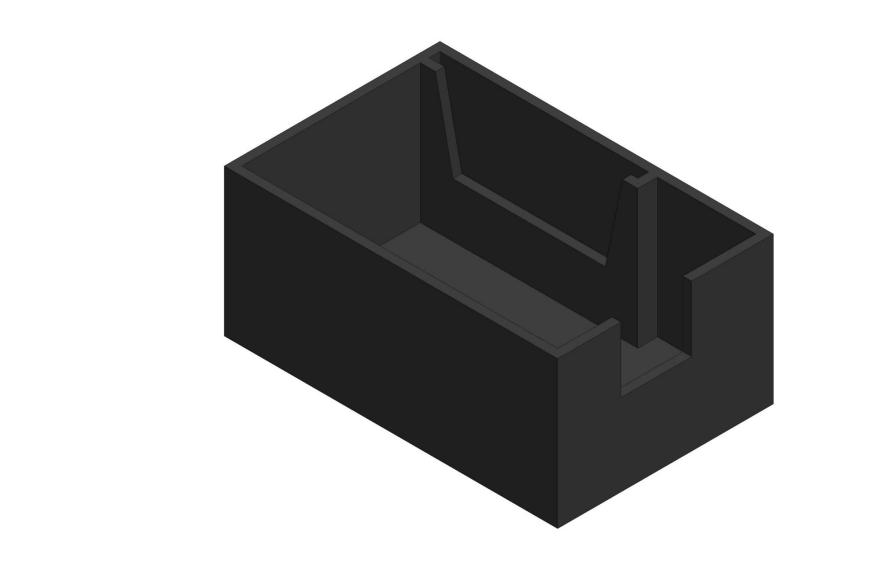
Step 4: Add Slot and External Holes for Soil Moisture Sensor

One of our requirements states that the soil moisture sensor must be inserted at least an inch into the soil. One option is to just run wires from the board to the sensor outside of the enclosure, but I like the idea of a fully packaged product.

I'm going to add a slot that will hold the moisture sensor vertically, allowing the probes to pass through the bottom of the enclosure.

Step 5: Create Cutouts for Wire Connections and Micro-USB Connector

We need to leave room for the wires to be soldered on the top of the moisture sensor, so let's remove some material while still maintaining a slot.

I'll also add a cutout for the micro-usb connector. The board will rest with the connector inside this slot, providing some alignment.

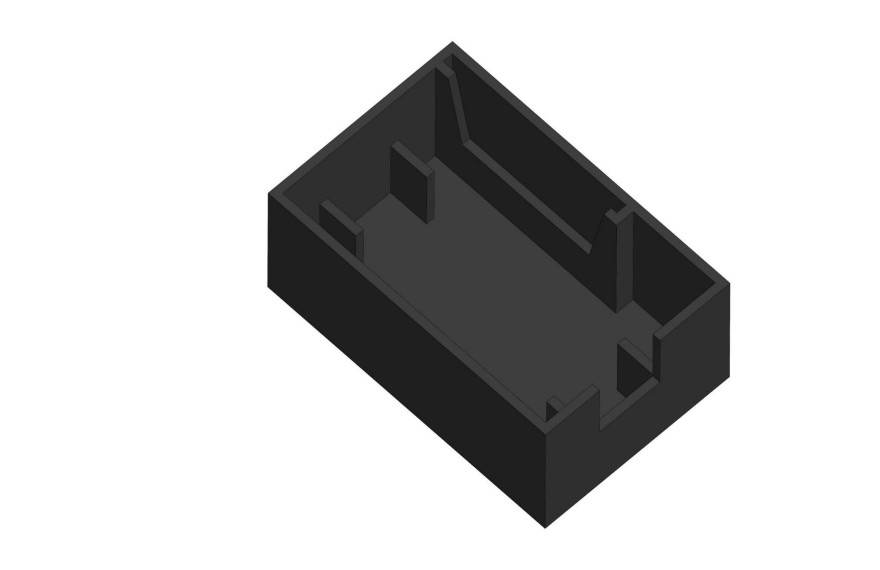
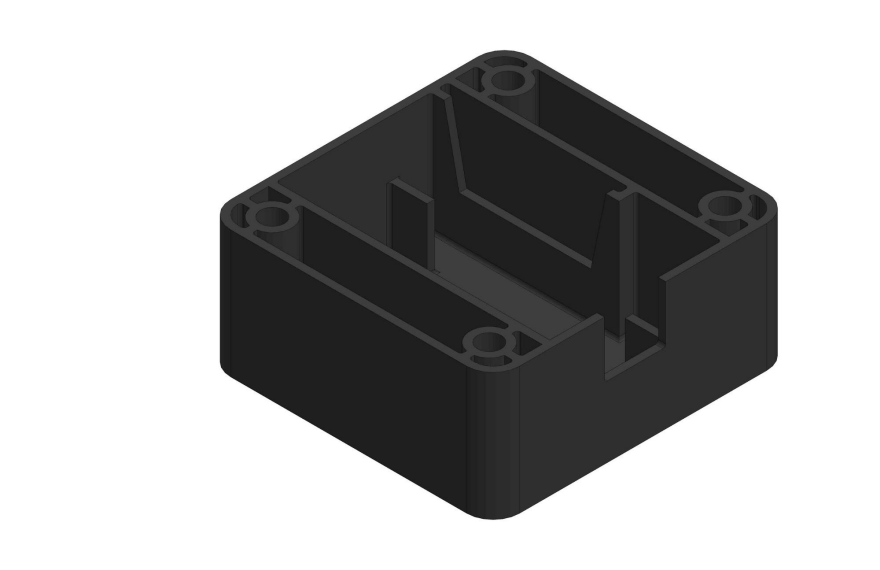
Step 6: Create Support Ribs for the Photon Board

The Photon board is currently being held on one side by its micro-USB connector, but we should add supports on which the board can sit.

Luckily, there is nothing mounted on the bottom of the Photon board, so we don't have to worry about hitting anything. A pretty simple way to create supports is to add ribs of our uniform thickness, where the board can rest.

Here's a current view of the assembly so far:

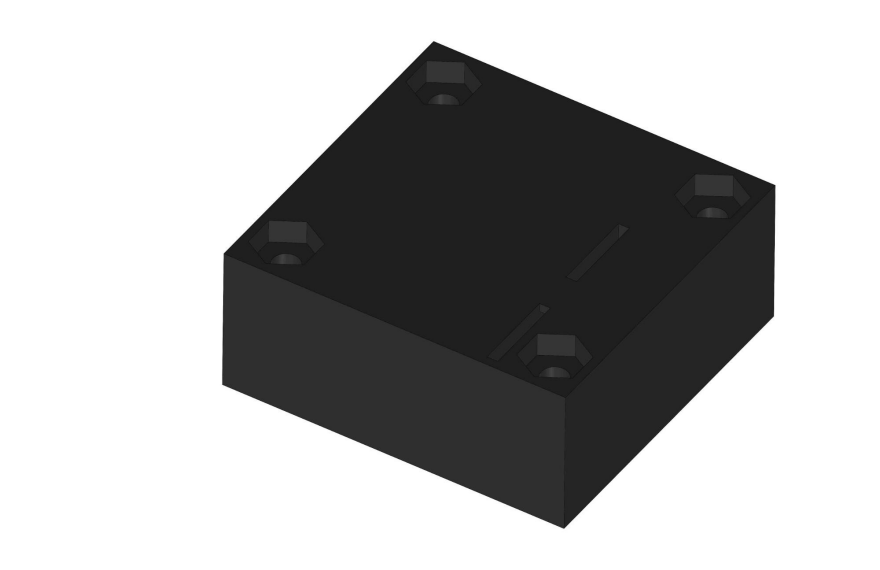
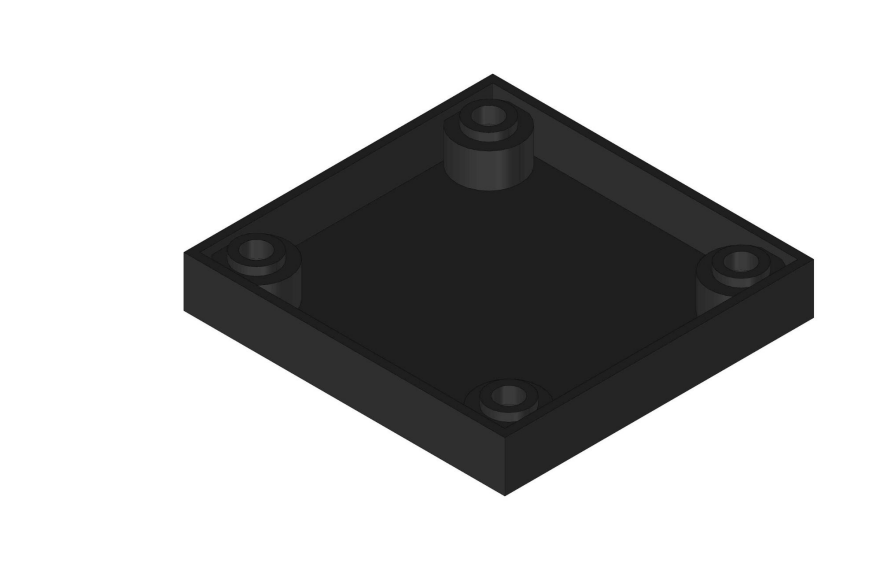
Step 7: Add Lid Fastener Features

Now we need to think about how the lid will be attached. I'm a big fan of the socket head cap screw, so let's add some extra features around the outside of the enclosure to allow a fastener to pass through.

The features you see here are typical in injection molding. Bosses surround the fastener holes and have additional ribs to the outer structure for support. All geometry has our same uniform thickness of .040".

Step 8: Add Nut Features

A trick for using metal fasteners in plastic parts is to countersink, or cut, the exact size of the nut on the bottom side of the part, keeping it from rotating while you screw in the fastener.

Step 9: Fillet Outer Corners

Finally, we're going to radius the outer corners, which will decrease the stress concentration there and also make the enclosure look a little more friendly.

We are still keeping a uniform thickness, so for the outer corners the outer radius (0.140") will be slightly larger than the inner radius (0.100").

While we're at it, let's radius our internal corners, too. It's important to keep these small to avoid adding too much material and increasing wall thickness.

Here is the completed bottom half of our enclosure:
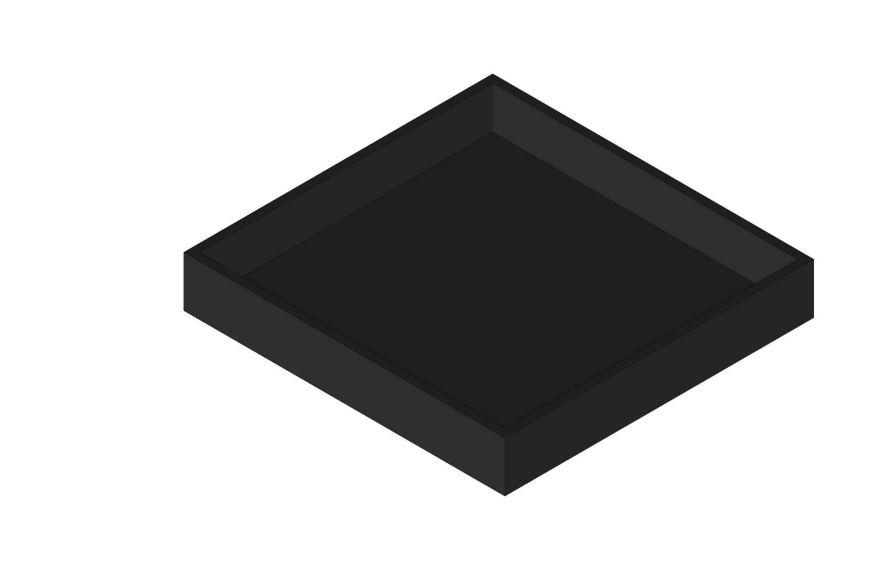
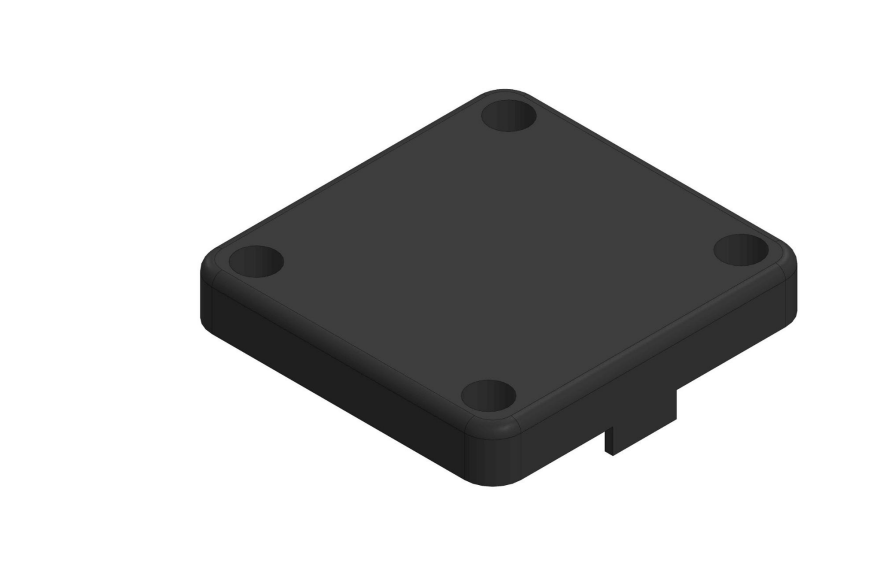
Step 10: Lid Design

Now on to the lid! We'll use the same types of features in the lid, shelling a box, adding bosses for the fasteners to pass through, countersinking the fasteners into the top, and radiusing the outer corners to match the bottom.

The bosses for the fasteners look as they do above because we are maintaining our uniform wall thickness, and that's what a countersink looks like from the other side.

I've also made the bosses slightly shorter than the outer wall height so that there are no interferences.

Step 11: Fillet Corners and Top Edge

Just like in Step 9 for the bottom of the enclosure, we will radius the outer corners of the lid to decrease the stress concentration and make the lid match the bottom.

Step 12: Add Protrusion to Hold Top of Micro-USB Connector

This little boss will mate with the top of the micro-USB connector, securing it in the slot in the bottom of the enclosure.

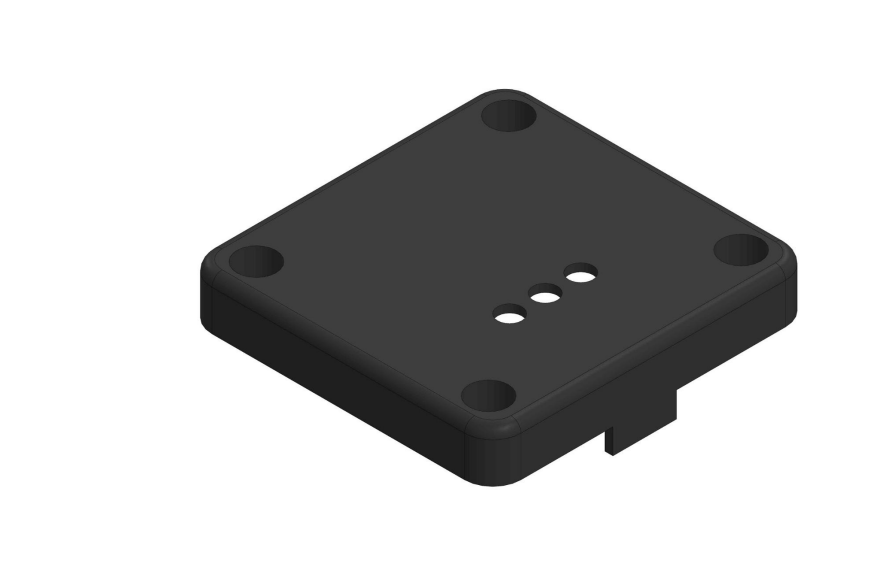
Step 13: Cut Holes for Buttons and LED Light

As per our requirements, holes are created for interacting with the buttons on the board and seeing the LED light.

Step 14: Add Rib for Holding Moisture Sensor

While the moisture sensor is being pushed into the soil, it will probably come up to contact the lid, which is less than ideal.

To remedy this, I'll add a rib that will hold the moisture sensor down in a more secure position.

Step 15: Radius Internal Corners

The final step is to radius all of those sharp corners that are not only aesthetically unpleasant, but have large stress concentrations. Again, we're going to keep the radii small (.005") to avoid adding too much material.

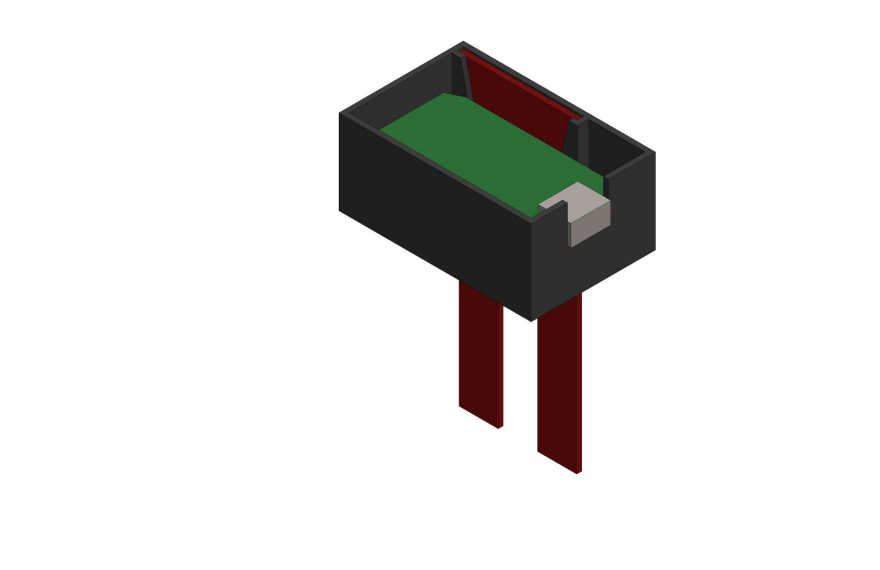
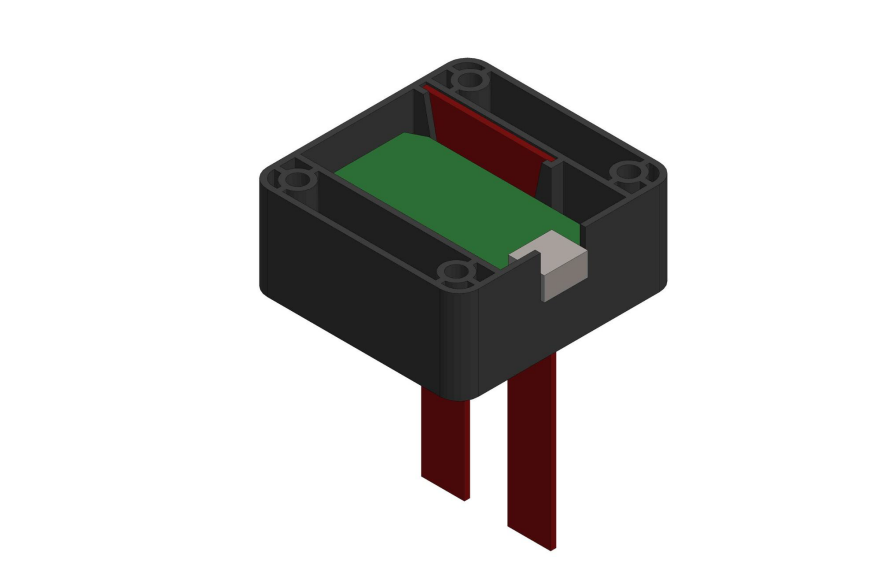
Now let's add the lid to our full assembly and throw in some hardware.

Be sure to leave space for wires and their bends! It's easy to forget about wire routing while you're designing until you're trying to assemble the product. You can see from the above section view that I've left plenty of room (nearly half an inch) above the board for wires and the small temperature sensor.

Final Notes

Hopefully this gives you some helpful guidelines for designing and prototyping your own product enclosure. To start 3D printing your enclosure design, hop on over to Fictiv where you can get 3D printed parts delivered in 24 hours.

___________________

This post is provided by Fictiv, the most efficient manufacturing platform for fabricating parts. Powered by a distributed network of highly vetted vendors, the online interface makes it easy for customers to get instant quotes, review manufacturing feedback, and manage orders—all through a single service.


The DTV Shredder: A Cross Between a Skateboard, a Snowmobile and a Scooter

$
0
0

Canadian inventor Ben Gulak conceived of the DTV shredder, the unusual vehicle you see here, while he was still a teenager. 

His motivation was practical: “It doesn’t make sense to have to buy an expensive snowmobile that you can ride for three months of the year and an ATV that you can ride for four months of the year,” Gulak told the TED organization. “I wanted to make something small enough that you could fit it in the back of any car. And I wanted it to be something you’d be able to ride all year, whether in snow, sand, or mud. Something that would be really all-terrain, all year.”


Being as compact as it is, I figured the thing would be electric, but you undoubtedly heard the sound of internal combustion in the video. The Shredder runs on a gasoline-powered four-stroke engine that can get it up to 30 miles per hour.

The Shredder has been in development for years, as you probably guessed by the “Christmas 2012” plug in the video. Although it’s currently available in the UK, North American emissions regulations require engine modifications that are still in the works. If you’re in the market for one, you can stay updated on the website of Gulak’s company, BPG Werks.

Design Job: Get in Shape: SmartShape Design is Seeking a Junior Industrial Designer in Cleveland, OH

$
0
0

Are you a creative industrial designer with a passion for product and a strong interest in UX design and development? We’d love to hear from you. SmartShape Design is currently hiring Junior Industrial Designers who can: Collaborate within a highly creative design and engineering team, developing innovative new product concepts.

View the full design job here

Reader Submitted: Design Students Join Forces with Audi to Design a Car Seat that "Breathes"

$
0
0

A Team of design students at the Braunschweig University of Art, under the supervision of Dr. Manuel Kretzer, visiting professor 'Digital Crafting', cooperated with Audi's development/innovation unit, lead by Mike Herbig, to rethink the notion of the car seat and create an innovative vision of a dynamic structure for the future of autonomous driving.

Final seat being activated
Credit: Maximilian Dauscha, Benedikt Schaudinn
Final seat rear view
Credit: Maximilian Dauscha, Benedikt Schaudinn
Final Seat side view
Credit: Maximilian Dauscha, Benedikt Schaudinn
Final Seat front view
Credit: Maximilian Dauscha, Benedikt Schaudinn
Final Seat front view
Credit: Maximilian Dauscha, Benedikt Schaudinn
3D printed seat right after completion
Credit: Itai Vinograd, BigRep GmbH
3D printed seat right after completion
Credit: Itai Vinograd, BigRep GmbH
Close-up photo of chair and controller
Credit: Benedikt Schaudinn
Concept sketch
Credit: Dong Kwon Lee
Design and Form studies in elevation
Credit: Maximilian Dauscha
View the full project here

Urban Low-Cost Alternative Housing Experiments for Young Professionals

$
0
0

London is an expensive place to live, and for young professionals it's tough to find affordable housing. When Tim Lowe was 26 and working as a property surveyor, he found his £1,000 a month rent too much to manage on his salary, and thus embarked on an alternative-living adventure.

Lowe's plan was to try out five different types of alternative low-cost housing and document what it was like living in each of them. Here's the series, called "Lowe-Cost Living:"

1. North London Disused Office Park

£400 per month

2. Camden "Luxury Shared Living" Building

£460 per month

3. East London Houseboat

£350 per month plus labor (pitching in with renovation)

4. Southwark Co-Op House Share

£460 per month

5. Mobile Horse Trailer

Price undisclosed, but apparently expensive

Would you be willing to live in any of those? Sure the locations are great, but I'd never have been able to hack the houseboat nor the horse trailer.


Does Your Camera Get Hot During Long Shoots? Here's How to Hack a Heat Sink to It

$
0
0

Making things can be time-consuming, and if you're recording your entire process on video, your camera can start to heat up as the minutes tick past. Industrial designer Eric Strebel found his Lumix GF7 getting so hot that it would shut itself off.

Strebel's solution: Harvest an aluminum heat sink from an old PC and hack it to fit the camera. He uses his drill press as a milling machine, and I found his wire tip about starting from the middle pretty insightful:


This Brilliant Business Lets Young People Live Cheaply in Abandoned Buildings

$
0
0

London-based company Lowe Guardians, and others like it, have an interesting business model. Technically a property management company, what they do is target landlords who have empty properties—which are often targets for vandalism—and protect those properties by installing live-in guardians.

These guardians come in the form of young creatives and professionals who are willing to live within, say, an empty industrial space. LG's clever move is to occasionally have two sources of income on a property that they don't even own; sometimes the landlords pay for guardianship, and the guardians always pay rent. On top of that, they're essentially pulling affordable housing (some of LG's prices are as low as £400 a month!) out of thin air in one of the world's more expensive cities to live in.

LG doesn't just hand over the keys to their (carefully-vetted) guardians, but endeavors to make the spaces livable, they say:

Every space has fully functioning kitchens, showering and washing facilities. We also provide a cleaner, WiFi, amazing communal spaces and events; all included within your license fee.

We establish a sense of community with every space that we take on. This could be holding a film night for our guardians, organising a barbecue, or just ensuring that our communal spaces are fitted out to facilitate social interaction. Whatever it is, we ensure to create an engaging, positive space that it is treated with respect. For landlords, there is an obvious benefit; their property is being monitored by a highly engaged guardian scheme at little or no cost.

Because these vacant structures might be anything from office buildings to old pubs to warehouses to former police stations, LG teamed up with architecture firm Studio Bark to create easy-to-assemble dwelling sheds to be installed inside the spaces.

I would love to see this model ported over to New York City, where if you look carefully, you'll see a shocking amount of empty and run-down buildings even in desirable neighborhoods like SoHo and TriBeCa. I think a lot of young folk would be happy to live in a (formaldehyde-adhesive-free) OSB box tucked inside of an enormous 19th-Century cast-iron warehouse building in Manhattan.

The company, by the way, was set up by Tim Lowe, the guy who tried living in different types of low-cost alternative housing in London and documented it on video

Design Job: Build Purposeful Experiences as Skyline Sector 5's Freelance 3D Exhibit Designer in Myrtle Point, OR

$
0
0

Skyline Sector 5 is looking for a Freelance 3D Exhibit Designer with experience in designing spaces with Skyline product. Building purposeful experiences for our clients, crew and community is at the core of everything we do at Sector 5. Trade show exhibits, branded activations, retail environments, events: you name it, we can do it. We’ve been forging authentic connections between brands and consumers since 2001 and we’re not stopping any time soon.

View the full design job here

Video of Hyperloop Pod Hitting 200 MPH!

$
0
0

If you present the concept of Hyperloop technology to, say, a plodding government body in charge of transportation, nothing will ever come of it. But if you build a design competition out of it, engaging young, active minds, progress can be made quite quickly.

SpaceX held their first Hyperloop Pod Competition in January of this year, where 27 university teams from around the world built prototypes and ran them through a battery of tests at SpaceX's one-mile Hyperloop track.

This month SpaceX held a second competition, inviting the best three teams that had cleared the first competition's hurdles and asking them to "focus on a single criterion: Maximum speed."

Two of the teams, from Switzerland's ETH Zurich and a joint U.S./Canada team from Northeastern University and the Memorial University of Newfoundland, experienced technical difficulties. But the WARR Hyperloop pod, created by the 30-member team from Germany's Technical University of Munich, absolutely crushed it, rocketing their prototype up to a blistering 201 m.p.h. (324 k.p.h.) within the one-mile test track. Musk posted this video of it:

Congratulations to the WARR team!


Ford and Domino's Running Autonomous Pizza Delivery Vehicle Trial

$
0
0

Ford and Domino's have collaborated on the Self-Driving Delivery Vehicle, an autonomous hybrid Fusion that will deliver pizzas to customers in a trial in Ann Arbor in the next few weeks. What's different about this, compared to other autonomous vehicle trials, is that the tests are meant to see how people outside the vehicles react.

"As part of the testing, researchers from both companies will investigate customer reactions to interacting with a self-driving vehicle as a part of their delivery experience," Ford writes in a press release. "This research is important as both companies begin to examine and understand customers' perspectives around the future of food delivery with self-driving vehicles."

While I can see why both companies would want to undertake such a trial, I think that from the perspective of the end user, pizza delivery is a poor application for an autonomous car, and a far better job for a drone. Here's why.

1. People are lazy.

The whole reason you order a pizza is because you don't want to get up off your lazy ass and go to the store. I think this sloth will extend to people not wanting to go outside into their driveways and press buttons on a tablet mounted to the car in order to get the correct pizza to come out of the window. Also, think about if it's raining outside: If the customer has a choice between selecting delivery via autonomous vehicle or by a deliveryperson who will ring the doorbell, which will they choose?

2. Pizzas are relatively small.

If you want to go autonomous, it doesn't really make sense, from an energy perspective, to put a 3,615-pound vehicle on the road to deliver a half-dozen pizzas. Even though the vehicle is a cleaner-burning hybrid, it's still going to require maintenance, storage, electricity, etc. While there are a number of regulatory hurdles to clear, pizza-delivering drones would make more sense from a carbon footprint perspective.

For their part, Domino's is aware of the challenge of getting someone to leave their house. "The majority of our questions are about the last 50 feet of the delivery experience," says Russell Weiner, president of Domino's USA. "For instance, how will customers react to coming outside to get their food? We need to make sure the interface is clear and simple. We need to understand if a customer's experience is different if the car is parked in the driveway versus next to the curb."


Reader Submitted: Here's what Happens when Kids Design Kitchen Products for Kids

$
0
0

Can kids make great products for kids? That was the question that got us going on this project. If the kids succeeded it would inspire more people of all ages to follow their dreams.

We first had to find an area for the kids to innovate. As most parents know, teaching kids to cook is an important part of their upbringing. A kid that makes broccoli will eat the broccoli. With so many positive arguments for kids cooking, why are there no good kitchen products for kids on the market?

So our project became: Let's see if kids can create the best kitchen products for kids, and let's film the entire process so everyone can be inspired by innovation.

The products have turned out to be amazing, and we have been super impressed by the young designers.

View the full project here

Volkswagen to Bring Back the "Magic Bus," This Time Electric-Powered

$
0
0

Volkswagen, whose reputation is still reeling from their emissions-cheating scandal, desperately needs a hit product.

The company is unique in that they had the world's longest-running, most-produced car ever in their venerable Beetle, a/k/a the Type 1; between 1938 and 2003, some 21.5 million rolled off of assembly lines on several continents. So iconic was the Beetle's design that VW was able to resurrect it in the '90s, and an iteration of it is still being produced today.

If there's one other design that VW has in its history that might inspire the same fervor, it is the Type 2. Colloquially referred to as the Magic Bus, the Minibus, the Microbus, the Kombi or the Camper, it too had startling longevity, being manufactured from 1949 until 2013.

The Type 2 hit its stride in the 1960s. Able to fit a half-dozen filthy hippies inside along with their drug paraphernalia and Aldous Huxley books, the relatively inexpensive Type 2 captured the imagination of the countercultural movement. And scientific studies have proven that if you show a Type 2 to an aged hippie today, nine out of ten of them will instantly begin weeping, dancing or both.

This year Volkswagen revealed the I.D. Buzz concept, an electric update to the Type 2:

The response has been so positive that VW has announced they are bringing it back.

"After the presentations at the global motor shows in Detroit and Geneva, we received a large number of letters and emails from customers who said, 'please build this car'," Volkswagen CEO Dr Herbert Diess said.

According to the press release,

Just like the [I.D. Buzz concept car], the production model will also have its batteries mounted in the vehicle floor. Because the electric drive components — electric motor, power electronics, and such —don't take up much space, the vehicle has a long wheelbase with short overhangs, allowing for a massively spacious interior and great proportions. "The vehicle looks like a compact commercial van on the outside, even though it offers the generous interior space of a large SUV," Diess explained.
CEO of the North American Region, Volkswagen, Hinrich J. Woebcken added: "This vehicle is the perfect balance between emotion, usability and sustainability, while also showcasing our technological leadership. The high seating position, cargo capacity, overall versatility and all-wheel drive option packaged into such an appealing design is just what our customers want from us. And it's the perfect fit for the zero-emissions American lifestyle."

Interestingly, a cargo version will also be produced, with VW perhaps eyeing the compact cargo fleet market currently enjoyed by the likes of Nissan's NV200.

The I.D. BUZZ won't just be a passenger vehicle. Just like the classic T2, the I.D. BUZZ will both haul people and haul freight. "Along with a minibus version, we'll also be offering an I.D. BUZZ CARGO variant for zero-emissions delivery of goods," said Volkswagen Commercial Vehicles CEO Dr Eckhard Scholz. "With Level 3 autonomous capability, this is an ideal concept for an electric van, particularly for delivering packages and goods to the inner cities."

(Note: "Level 3" autonomy means certain safety-critical functions can be automated, but a driver must still be prepared to take over if the shit hits the fan.)

Volkswagen says production for the I.D. Buzz will begin in 2022.


Tools & Craft #62: MoMA's Lost History of Woodworking and Craft Classes

$
0
0

Nowadays the Museum of Modern Art, aka MoMA, is well known for a rarified take on expensive modern art. I try to go visit MoMA several times a year (natives and savvy tourists know when the $25 admission fee is waived) and often feel frustrated by the insularity and smug self-consciousness of the art. Interestingly, at its inception, MoMA very assertively proposed a very different model. It conceived of itself as a place whose mission was "educational in the broadest, least academic sense," in the words of Alfred H. Barr, Jr., MoMA's founding director.

I own an intriguing book published by MoMA in 1951, "How to Make Objects of Wood," in keeping with this mission. 

The book was the third in the series, "Art for Beginners," which was "planned as a means of self-instruction for persons working on their own and as an aid for the teacher in directing large groups." The authors of the book included Victor D'Amico, a progressive educator who began working as the director of MoMA's Education Project. In that capacity, he created several outreach programs, including MoMA's War Veterans' Art Center and its successor entity when the veterans' center disbanded in 1948, the People's Art Center.

The book's other two authors, Kendall T. Bassett and Arthur B. Thurman, were affiliated with War Veterans' Art Center; Bassett was also affiliated with the People's Art Center.

I must confess that I was struck by these entities' names, which certainly evoke another era. MoMA has an extensive education program to this day, but the activities, which include a lovely program for kids and on-line and in-person classes for all ages, really focus on art appreciation. Hands-on craft is generally restricted to kids' projects. I couldn't find MoMA classes for adults that promoted craft as something to do oneself, rather than something to admire when an expert creates it. But the War Veterans' Art Center and the People's Art Center promoted the idea that art could be made by all sorts of regular people. Rather than just copying what was in a gallery (the traditional museum approach), students at these Centers worked in a workshop to develop their craft and creativity.

According to this press release announcing the War Veterans' Art Center's first art show, "The Art Center has a twofold object: to give veterans an opportunity for personal satisfaction in creating some form of art; and to provide preliminary professional training in the fundamentals both of fine and applied art."

The center, which was founded in 1944, 15 years after MoMA's founding, was open free of charge (for both instruction and materials) to all returned service men and women. The press release described the center as " a place where returned service men and women not only learn but produce painting, sculpture, ceramics, industrial design, jewelry, silk screen printing, graphic arts and allied subjects."

The first year's divisions included Design Workshop; Drawing and Painting; Graphic Arts; Jewelry and Metalwork; Lettering, Layout, and Typography; Orientation; Sculpture & Ceramics; Silk Screen Printing; Wood Engraving and Book Illustration; and Woodworking Design (taught by Kendall T. Bassett). A typical student was a veteran who, prior to the war, worked as a farmer but "doesn't want to go back to farming and has decided that our class in Woodworking Design offers him an opportunity to develop a new vocation." Another student mentioned by the administration suffered an eye injury in combat and was cautioned to avoid heavy labor. "Attracted by the class in Woodworking Design, he came to the Center where he hopes to learn to make toys and small furniture, thus using his skill without physical strain." 

Response and Responsibility: The War Veterans' Art Center at the Museum of Modern Art (1944-1948), a master's thesis written about the center, noted that veterans were screened but allowed to enroll at any point of the class and proceed at their own pace at projects that were organized for increased complexity—a system Victor D'Amico developed specifically for veterans, although it has obvious echoes in progressive child education generally.

In its excitement about its individual-centered approach, MoMA proposed to distribute pamphlets directly to veterans for self-instruction; the publication project then grew into the "Art for Beginners" series, a partnership with Simon & Shuster for publication of books for the general public. How to Make Pottery and Ceramic Sculpture, published in December 1947, was the first. I have that book and another book from the series, How to Make Modern Jewelry in their 1960s paperback editions. (The series includes another book, How to Draw and Paint.)

What did the books have to say?

How to Make Objects of Wood is a notably straightforward book. There isn't chat about the philosophy of woodworking. The text, which addresses design and construction techniques, and the numerous black & white photographs and sketches, all come right to the point.The tone is encouraging in its matter-of-fact belief that the reader can accomplish a great deal if he or she follows the instruction. The participants from the War Veterans' Art Center were, after all, experienced at following commands.

The projects start out with a joint and eventually graduate to a desk and dollhouse. You can do it, the book suggests. We believe in you.

Although MoMA's progressive centers had broad support from its trustees, including members of the Rockefeller family, they withered away with the retirement of their chief champion, Victor D'Amico. The redemptive project of making "objects of wood," as the humble title called them, was forgotten.

Nowadays we have plenty of veterans, plenty of art museums and a profession called "art therapy" that requires a master's degree. But we don't teach woodworking at museums, and we generally separate therapy from vocational training or just evening education. Programs like the War Veterans' Art Center or the People's Art Center ended up unable to survive the absence of their charismatic leader, but the ideas they represented deserve a resurrection.

___________________

This "Tools & Craft" section is provided courtesy of Joel Moskowitz, founder of Tools for Working Wood, the Brooklyn-based catalog retailer of everything from hand tools to Festool; check out their online shop here. Joel also founded Gramercy Tools, the award-winning boutique manufacturer of hand tools made the old-fashioned way: Built to work and built to last.


Design and Technology Join Forces at solidThinking's Converge 2017

$
0
0

As designers, we think and act in ways that vary greatly from scientists, engineers and even other types of designers we typically don't encounter in our day-to-day lives. But what would happen if we bridged the communication gap between students and professionals working at the intersection of design and technology? Working across industries yields better parts, products, manufacturing and business, but how do we connect the dots to make these connections happen in real life? solidThinking aims to explore these concepts and more at Converge, their one day conference focusing on exploring the relationships between design and technology.

Unlike many user-group type conferences, solidThinking's focus with the Converge conference is more about bringing a wide range of industry professionals together and less about product promotion. Last year's diverse attendee list included industrial designers, product designers, engineers, architects, scientists and experience designers, and this year is expected to have an even wider range.

Oh, and did we mention it's completely free?

This year's keynote speaker list is still growing, but there are a few currently on the lineup that we're particularly excited about. It's important to note that none of this year's keynote speakers use solidThinking software at work, further showing that Converge's focus is genuinely centered on designing a better world, together.

Jason Lopes

If you've ever wondered about the connection between design and engineering in the entertainment industry, Jason Lopes is your man. Working as a software engineer for over 10 years, Lopes specialized in bridging the gap between 2D/3D data and additive manufacturing. 

Prior to his current role at Carbon, Lopes worked as the lead systems engineer at Legacy Effects, where he worked on some films you may be familiar with. Some of his credits include Avatar, Terminator Salvation, Alice and Wonderland, and Iron Man 1, 2 and 3, just to name a few.

Timothy Prestero  

Founder/CEO of Design that Matters and friend of Core77 Timothy Prestero's diverse background in both for-profits and nonprofits includes his current role, his time in the Peace Corps and working on the board of two for-profit companies. 

In his Converge presentation, How can a Few People on a Shoestring Budget Save a Million Lives?, Prestero will explain how even small design firms with limited resources can prevent an enormous amount of human suffering.

Tim Morton

Tim Morton's eclectic design background includes working with companies like Dell, Rubbermaid Commercial and LEGO Group—talk about a diverse career.

At Converge, Morton will give a keynote talk titled How to Build a Rocket, where he'll discuss the merger between Newell Rubbermaid and Jarden, joining forces to create the Newell Brands conglomerate. How does a design team in this situation partner to continue to inspire consumers, create engaging experiences and deliver upon the promise it set out to accomplish across more than 40 brands?

After listening to these industry leaders and more speak on the importance of technology and design working hand in hand, the event will conclude with pretty sweet party, from what we hear. solidThinking hopes the free conference will inspire the next generation of designers to work together for a better world, and of course, we're hoping it will too. See you in September!

Want to attend Converge 2017? Learn more and register for the free conference here.

Steven M. Johnson's Bizarre Invention #209: The Self-Shortening Coupe

Here's "2036: Nexus Dawn," the New "Blade Runner" Short Film!

$
0
0

While the first Blade Runner was set in 2019, the sequel is titled Blade Runner 2049. What happened in that world during the 30-year gap? To fill us in, the producers are releasing three short films to provide some crucial details.

The first, just released yesterday, is below. Before you watch it, here's some context to set up the short:

- Following the events depicted in the original Blade Runner, replicants were outlawed in 2023. This is referred to as "Prohibition"

- In 2025, the Wallace Corporation used an unspecified technology to solve a global food crisis

- In 2030, the Wallace Corporation began lobbying for a repeal of replicant Prohibition

- This short takes place in 2036, where Wallace Corporation CEO Niander Wallace is called before a panel of lawmakers

We'll say no more. Enjoy!


Design Job: Enlisted Design is Currently Enlisting Mid to Senior Level Visual Designers in Oakland, CA

$
0
0

Enlisted Design is seeking a new addition our group of creative visual and product designers. We are a passionate team and thrive on a highly collaborative relationship with our client partners to create and launch new brands and products. If you are a mid-to-senior level visual designer who loves packaging and pets, we want to meet you!

View the full design job here
Viewing all 19155 articles
Browse latest View live


Latest Images